
SSH on Windows
There are a couple of different options for using SSH on Windows. Some alternatives are below.
Windows 10 OpenSSH client (built-in) §
As of Windows 10 version 1809 (the notorious Fall 2018 update) there are native OpenSSH ports that can be installed as optional components. Recent versions of Windows 10 usually have the client installed by default, but not the server (very few users will need the SSH server). There are notes on the installation of the SSH client (and server) at Microsoft.
Note that these versions do not run on the Windows Subsystem for Linux, but are native builds - ssh.exe and so on. Of course you can run OpenSSH on WSL as well.
You get all the normal ssh utilities – ssh, scp, sftp etc. In more recent versions (certainly by Win 10 1909) there is also a ssh-agent installed – it appears as a service titled OpenSSH Authentication Agent. This is disabled by default.
The binaries live in %SYSTEMROOT%\System32\OpenSSH\ and this is included in the system Path.
Creating a key with ssh-keygen reveals the default storage location in, as you'd expect, %USERPROFILE%\.ssh. Directory is not hidden. It gets permissions inherited from the profile directory. Public and private keys get custom permissions - these are:
Private
| User | Access |
|---|---|
| NT AUTHORITY\SYSTEM | FullControl |
| BUILTIN\Administrators | FullControl |
| Owner | Modify |
Public
| User | Access |
|---|---|
| Everyone | ReadAndExecute |
| NT AUTHORITY\SYSTEM | FullControl |
| BUILTIN\Administrators | FullControl |
| Owner | Modify |
The permissions for the private key (as for linux/BSD etc.) are important - if anyone else can read them it will complain. The public key is probably not so critical - after all, it's public.
Copying a ssh certificate to the .ssh directory and leaving it with the inherited permissions worked fine - it could be used to log on to a system set up to trust the certificate signing key in the normal way.
Note there does not appear to be any ssh.conf file in %PROGRAMFILES%\ssh, or settings in the registry. If you want to check what default keys it's looking for run ssh with -v to give debugging information.
If you need a more recent version of ssh you can find it at the project website.
MobaXTerm §
MobaXTerm is primarily notable as an XWindows Server for (Microsoft) Windows. It's commercial but free for personal use. Separately from that, however, it is also capable of generating and managing ssh keys.
The workflow in that is:
-
Go to
tools → MobaKeyGen -
Choose EdDSA, and generate a key pair.
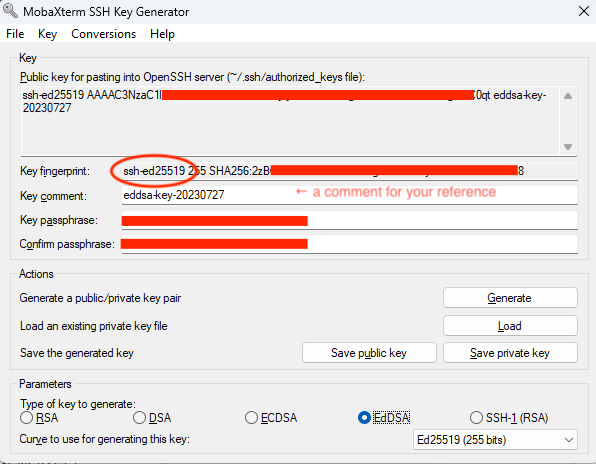 Note that selecting
 EdDSAhere is what selects the appropriateed25519key type. The one-line string at the top is the thing you paste in to the SSO interface. -
If you click on ‘Save public key’ it generates a public key in a format which is not the one we need for the SSO interface. Instead, copy the ‘Public key for pasting...’ text from the box and put it in a
.pubfile (or paste it directly into the SSO interface). -
Make sure you include a key passphrase. Without a passphrase, anyone (or any malware on your machine) can ssh into services as you. You should not regard filesystem protection of the files as sufficient.
-
If you click on ‘Save private key’ it wants to generate a Putty
.ppkfile. Instead, choose ‘Conversions → Export OpenSSH key’. -
Put both keys in
C:\Users\<username>\.ssh. If using WSL2 also put them in (eg, for Ubuntu)\\wsl.localhost\Ubuntu\home\<username>\.sshandchmod 600the private key.
Observe that MobaXTerm doesn't force you to create a key passphrase, nor even much push you towards doing so. So you will need to remember to add the ‘Key passphrase’ in the box in the dialogue.
PuTTY §
PuTTY is a long-established ssh client. Although it is historically the most common ssh client for Windows use, it does have some shortcomings. In particular, it cannot handle ssh certificates yet (it is on the very long wish list). You also need to convert keys from the PuTTY default format to the ‘OpenSSH’ format (not hard, but a bit annoying).