
Enabling full-disk encryption on macOS
The most straightforward case is where you wish to enable full-disk encryption (FDE), optionally with a recovery key, and this is described below. Variants are described after that.
For further details, including a discussion of other operations. see Apple’s FileVault 2 overview.
The end-state of the instructions below is:
-
Your entire startup disk is encrypted, and a decryption key must be provided before the machine will even boot. If your machine is lost or stolen, nothing can be retrieved from the disk.
-
One of the decryption keys is the same as your login password. You are asked for this password at an early stage in the machine's boot process. Although, yes, there is an extra step happening here, in normal operation it is entirely invisible to you.
-
You may choose to generate an additional (ie, second) decryption key which you can write down and store somewhere safe. This can be used to decrypt your disk in a fairly convenient manner, if you should happen to forget your login password. School IT staff are willing to hold these additional keys securely, in case of accidents.
Enabling full-disk encryption §
To enable full-disk encryption on macOS, perform the following steps. This process can potentially take quite a long time – hours – and will involve a reboot (how long, exactly, depends on how much disk space you're using; it seems to take very roughly a minute per GB). You can continue to work after the machine has started encrypting, but you shouldn't interrupt the process.
Make sure
- your machine is on mains power,
- it's OK to reboot as an early part of the process, and
- you are able to leave it overnight if necessary.
1. Go to the FileVault preferences panel
Go to ‘System Preferences’ » ‘Security & Privacy’, and click the lock at the bottom to enable changes; this will ask you to enter your password; do so. Afterwards, the panel should look like this:
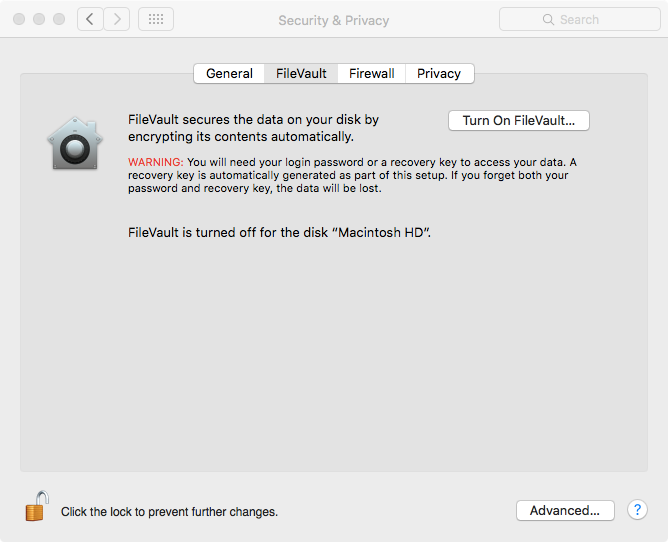
2. Click on ‘Turn on FileVault...’
At this point, the machine will do nothing, and be rather unresponsive, for 30s or so, which feels alarmingly long, if you're not expecting it. It will then reboot itself.
3. Wait
After the machine has rebooted, the ‘Security & Privacy’ preferences panel will re-open. After another alarmingly long pause, it will show that it has started encrypting, and give an estimate of how long the process will take.
At this point, you can carry on working (if you wish), while the machine busies itself encrypting your disk.
After the process has completed, your disk is encrypted.
During the process, you may (slightly depending on your version of macOS) have been prompted to write down a ‘recovery key’, which looks like
0123-4567-89AB-CDEF-0123-4567
Write this key down somewhere secure. Local IT staff are willing to
store these keys securely, in case of accidents: email it to
phas-encrypt@glasgow.ac.uk.
At this point there are two decryption passwords, either one of which can decrypt your disk: one is the same as your login password, and the other is this ‘recovery key’.
You're sorted.
Alternative: Adding a recovery key §
You may find it useful to add a recovery key, which can decrypt the disk if you forget your login password. Such a key should have been added automatically if you followed the procedure above. If you have forgotten that key, however, or wish to add a key in addition to this, then you can add it this way.
Open a Terminal. On macOS 10.13 and later:
% sudo fdesetup changerecovery -personal
Password:
Enter the user name:fredbloggs
Enter the password for user 'fredbloggs':
New personal recovery key = 'XXXX-...-XXXX'
%
Older macOS versions have a rather confusing password prompt:
% sudo fdesetup changerecovery -personal
Password:
Enter a password for '/':
New personal recovery key = 'XXXX-...-XXX'
%
In each case, the first password prompt is for the sudo command.
You need to enter the same login password twice, at the two prompts.
Write down the generated recovery key (remember to clearly distinguish zero and capital-O), and store it somewhere safe.
Checking the recovery key §
If you want to check you have transcribed the recovery key correctly, then, in a Terminal:
% sudo fdesetup validaterecovery
Enter the current recovery key: <XXXX-XXXX-....>
true
%
You may need to type in your login password first, for the sudo
command, if it gives you a Password: prompt.
When you type in the key, it must be typed in uppercase letters,
and including the dashes.
You can confirm the status of the keys with
% fdesetup status
This is another operation concerning which it might be worth consulting local IT staff.